(Hack for Apple Logic/Ableton Live) How to Freeze AUX/Group Tracks (Yes, you can freeze ’em!)
PC performance has significantly improved these days, leading many to mix everything natively. However, even though you are running pretty high spec PCs, you’ll find some cases that you wish you had more CPU/RAM, especially during Subgroup Mixing.
You can freeze Audio and Instrument tracks, but unfortunately, you can’t freeze AUX/Group tracks. I thought it would be convenient if this were possible, so after some searching, I found a way to do it ^^.
This time, I introduce how to freeze freeze AUX/Group tracks on respectively Apple Logic and Ableton Live. Pro Tools already has a feature to freeze AUX tracks, so it may not be necessary for that DAW. However, I believe this can be applied to any other DAWs as well, although I’ve only teste on Logic and Ableton.
Required Plugins
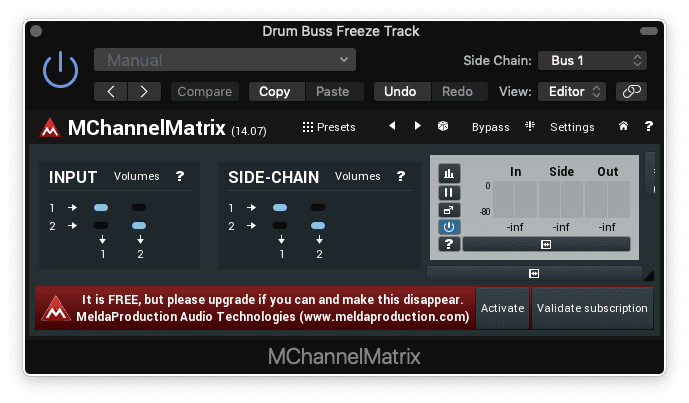
All you need is a free plugin called MChannelMatrix. It’s a highly useful utility plugin that allows you flexible routing. And the best part is, it’s free. This is what it looks like.
Why should you freeze AUX/Group tracks?
Here is the session I created this time.
<Screenshot 1>
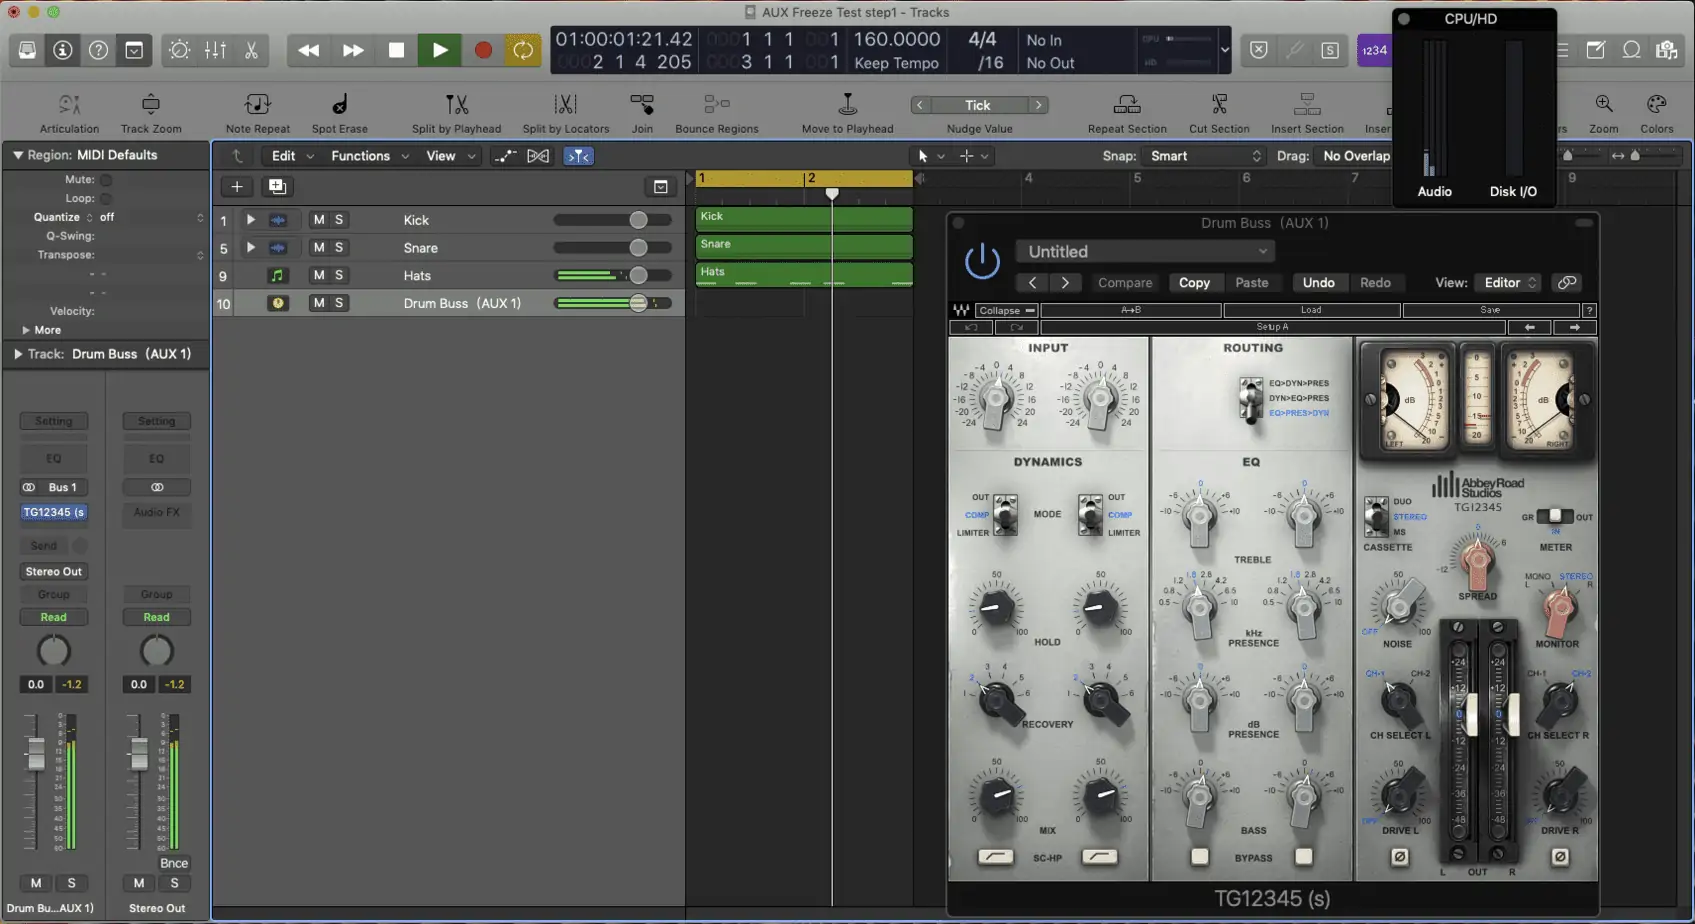
As you can see, I’ve simply grouped the Kick, Snare, and Hats into an AUX track to create a drum bus. The track labeled “Drum Buss (AUX1)” at the bottom is the AUX track I’ve consolidated as the drum bus. I’ve inserted Waves’ TG12345 into this “Drum Buss (AUX1).” It’s a great channel strip, but it could be quite heavy on CPU/RAM usage.
As you can see from the CPU/HD meter in the top right corner of the screenshot, the CPU/RAM usage has
significantly increased just by using TG12345. If this continues to increase by adding more busses
such as Bass Bus and Melody Bus, so on…, it could lead to CPU overload.
Other channel strips, like “Lindell 80” which has oversampling features, offer great
sound quality but are also quite heavy on resources as well.
So the purpose of this article is to show you how to freeze this AUX track in order to save the strain on CPU/RAM resources.
Originally, Logic and Ableton Live do not have a feature to freeze AUX/Group tracks. However, by using the aforementioned MChannelMatrix, it is in fact possible to freeze them.
Additionally, by applying this technique, it’s also possible to freeze send reverbs. I highly recommend trying this out, especially for those who like to use a variety of different reverbs.
For those using Ableton Live, please skip to section below.
For those who are lazy to read whole article, here is the summary of this article!
Setup in Logic
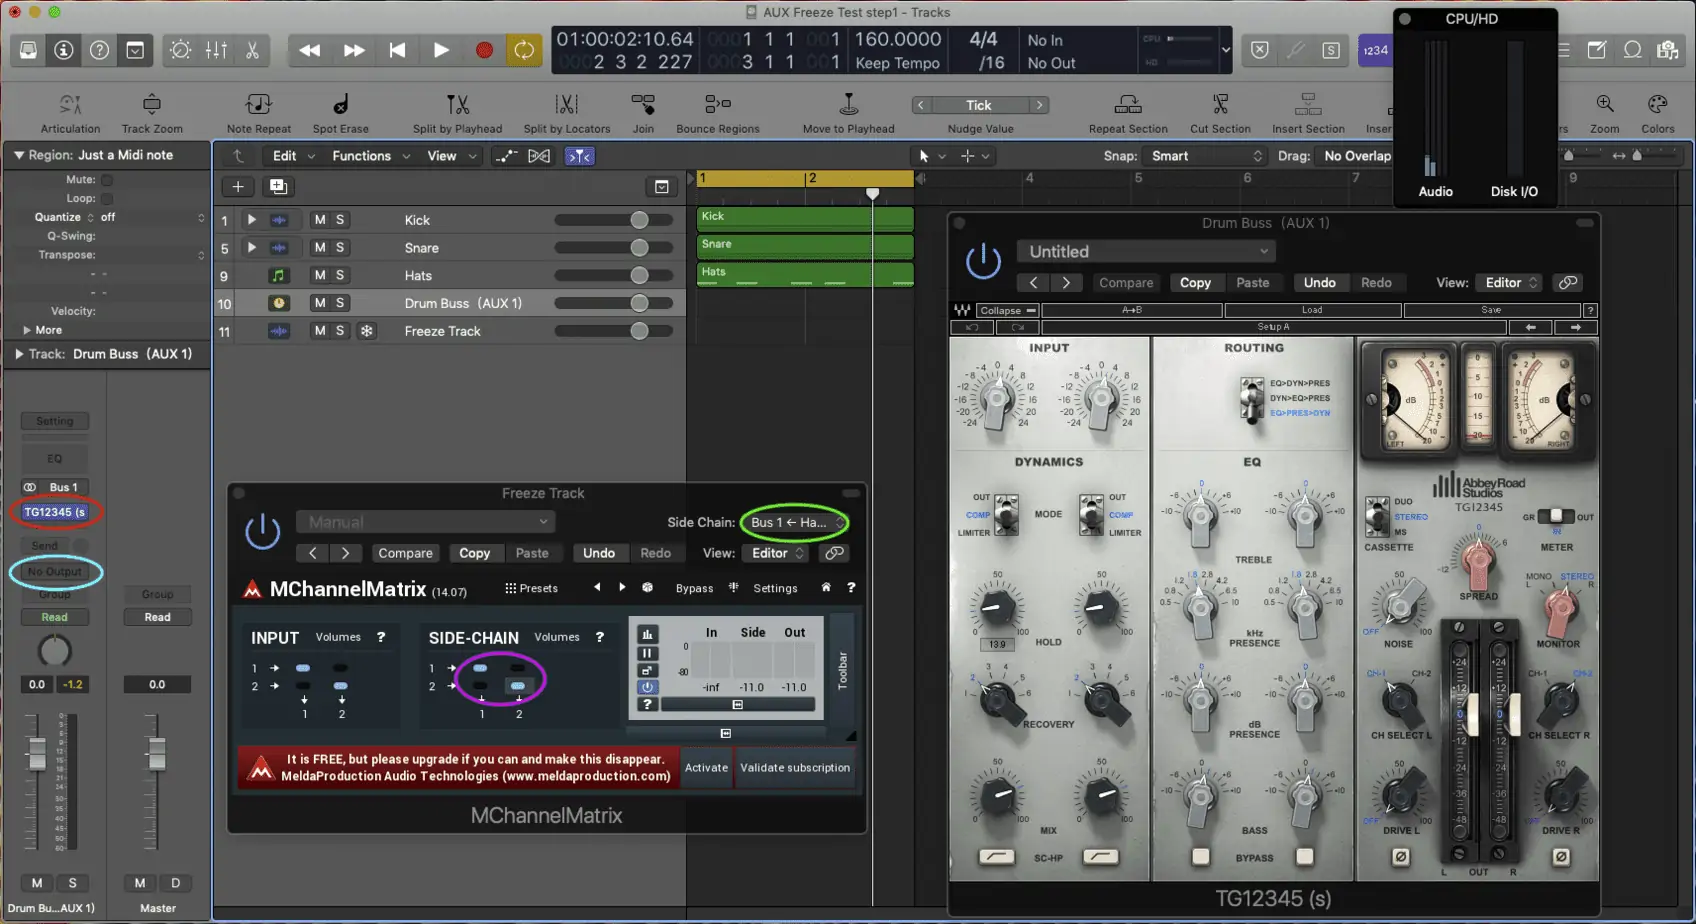
Firstly, from the state shown in <Screenshot 1>, I’ve added an audio track called “Freeze Track” at the very bottom. I’ve inserted “MChannelMatrix” into this new audio track “Freeze Track.”
MChannelMatrix Setting
- As shown in <Screenshot 2>, set the “SIDE-CHAIN” section of MChannelMatrix (indicated by the pink circle in <Screenshot 2>). It should be set to 1=1(left), 2=2(right).
- Next, set the input source of MChannelMatrix (indicated by the green circle in <Screenshot 2>) to “Bus 1.” This is because “Drum Buss (AUX1)” is routed into “Bus 1” (In Logic, this is automatically set up this way, so unless you’ve changed the settings, “Bus 1 = AUX 1”).
Channel Routing Settings
Set the Output of “Drum Buss (AUX1)” to “No Output” (indicated by the light blue circle in <Screenshot 2>). Since the sound will come out from the “Freeze Track” channel where MChannelMatrix is inserted, you should set the output of this “Drum Buss (AUX1)” to “No Output” to cut it off. If you don’t, sound will come out from both, resulting in a blast of noise, so be careful.
Create a Region for Freezing
Now, the sound from “Drum Buss (AUX1)” should be coming out from “Freeze
Track,” but you can’t freeze it yet because there is no region in “Freeze
Track.” So, I’ve inserted a MIDI region into the audio track for the time being. It
looks something like this in <Screenshot 3>.
<Screenshot 3>

The red circle on “Freeze Track” indicates the inserted MIDI region. The content of the region is quite simple; as shown by the light blue circle, I’ve just extended a C3 note from the beginning to the end of the region.
You might be wondering, “A MIDI region in an audio track?” But having this region allows you to freeze the track.
Freeze it bro! Freeze!
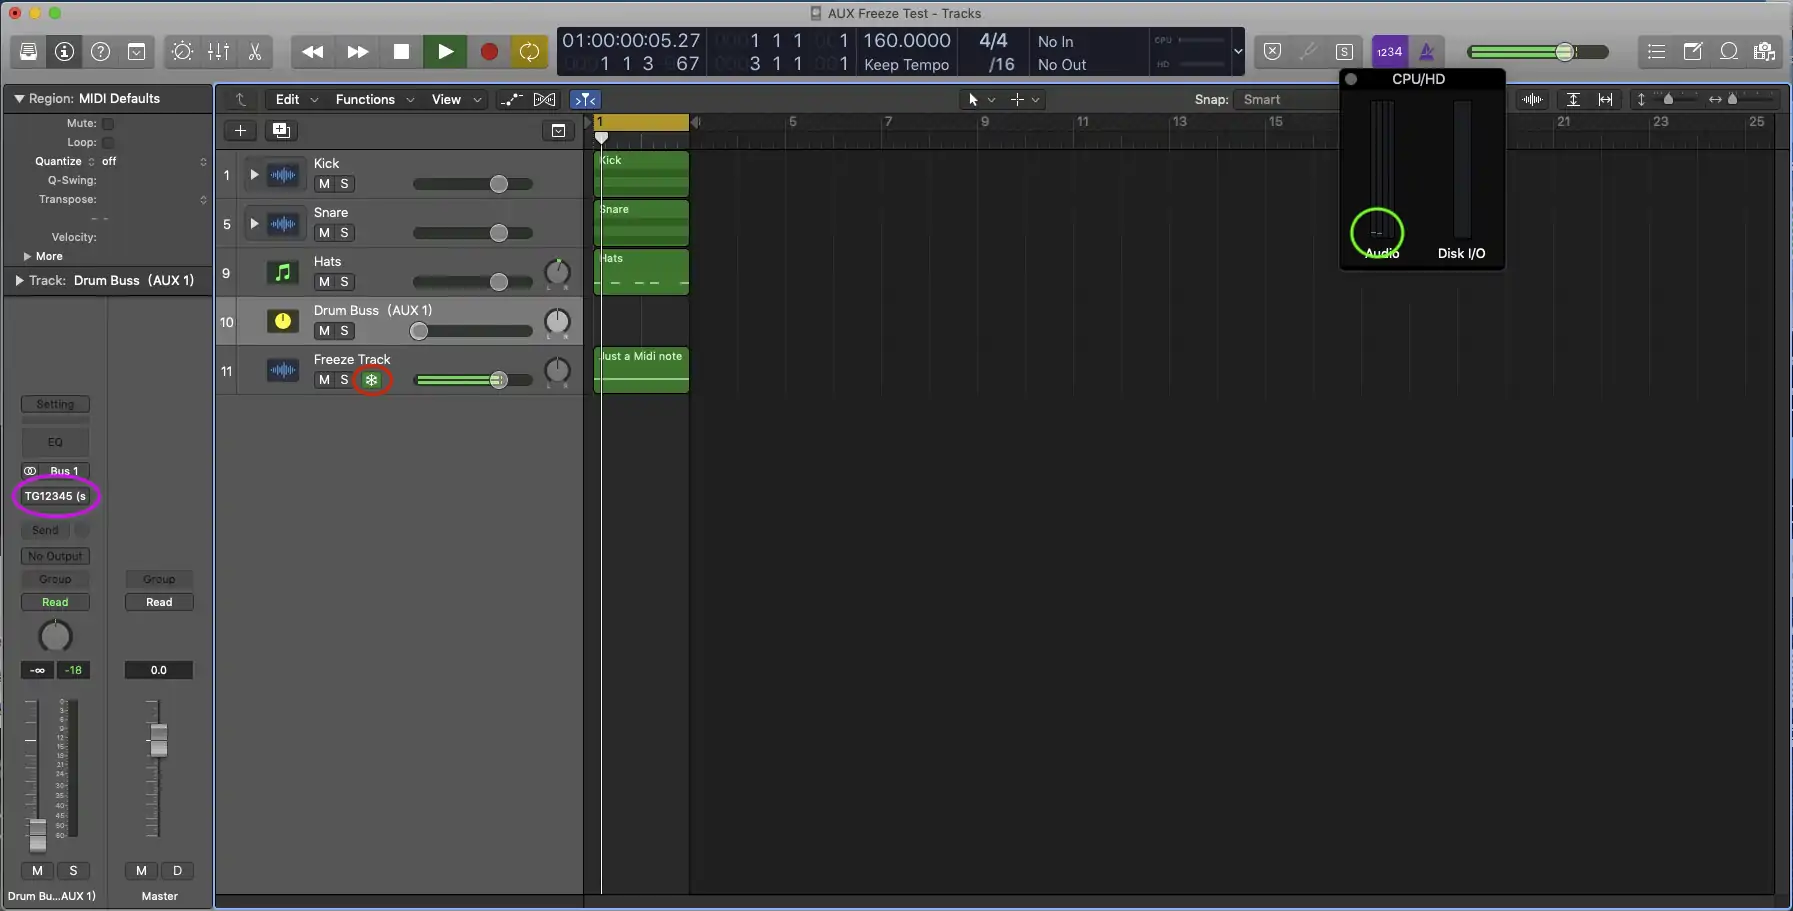
- Click the area indicated by the red circle in <Screenshot 4> to freeze the track.
- Turn off the TG12345 inserted in “Drum Buss (AUX1)” (indicated by the pink circle in <Screenshot 4>).
Now, the “Freeze Track” has been frozen. You’ll likely notice a significant
reduction in CPU/RAM usage since TG12345 has been turned off (indicated by the green circle in
<Screenshot 4>).
At this point, the output will only be from “Freeze Track,” so if you have effects on
tracks which has output to “Freeze Track”, you should turn them all off as well.
In <Screenshot 4>, I’ve lowered the fader of “Drum Buss (AUX1)” all the way down to make it clear that the sound is only coming from “Freeze Track.” However, since the Output has been set to “No Output” as mentioned above, there’s actually no need to lower the fader (fader doesn’t do anything in this case).
That concludes the setup process for Logic.
If you need to edit again, simply unfreeze and turn on the effects in the AUX track. Once you’re done editing, re-freeze and turn off the effects in the AUX track.
Next is the setup process for Ableton Live.
Setup in Ableton Live
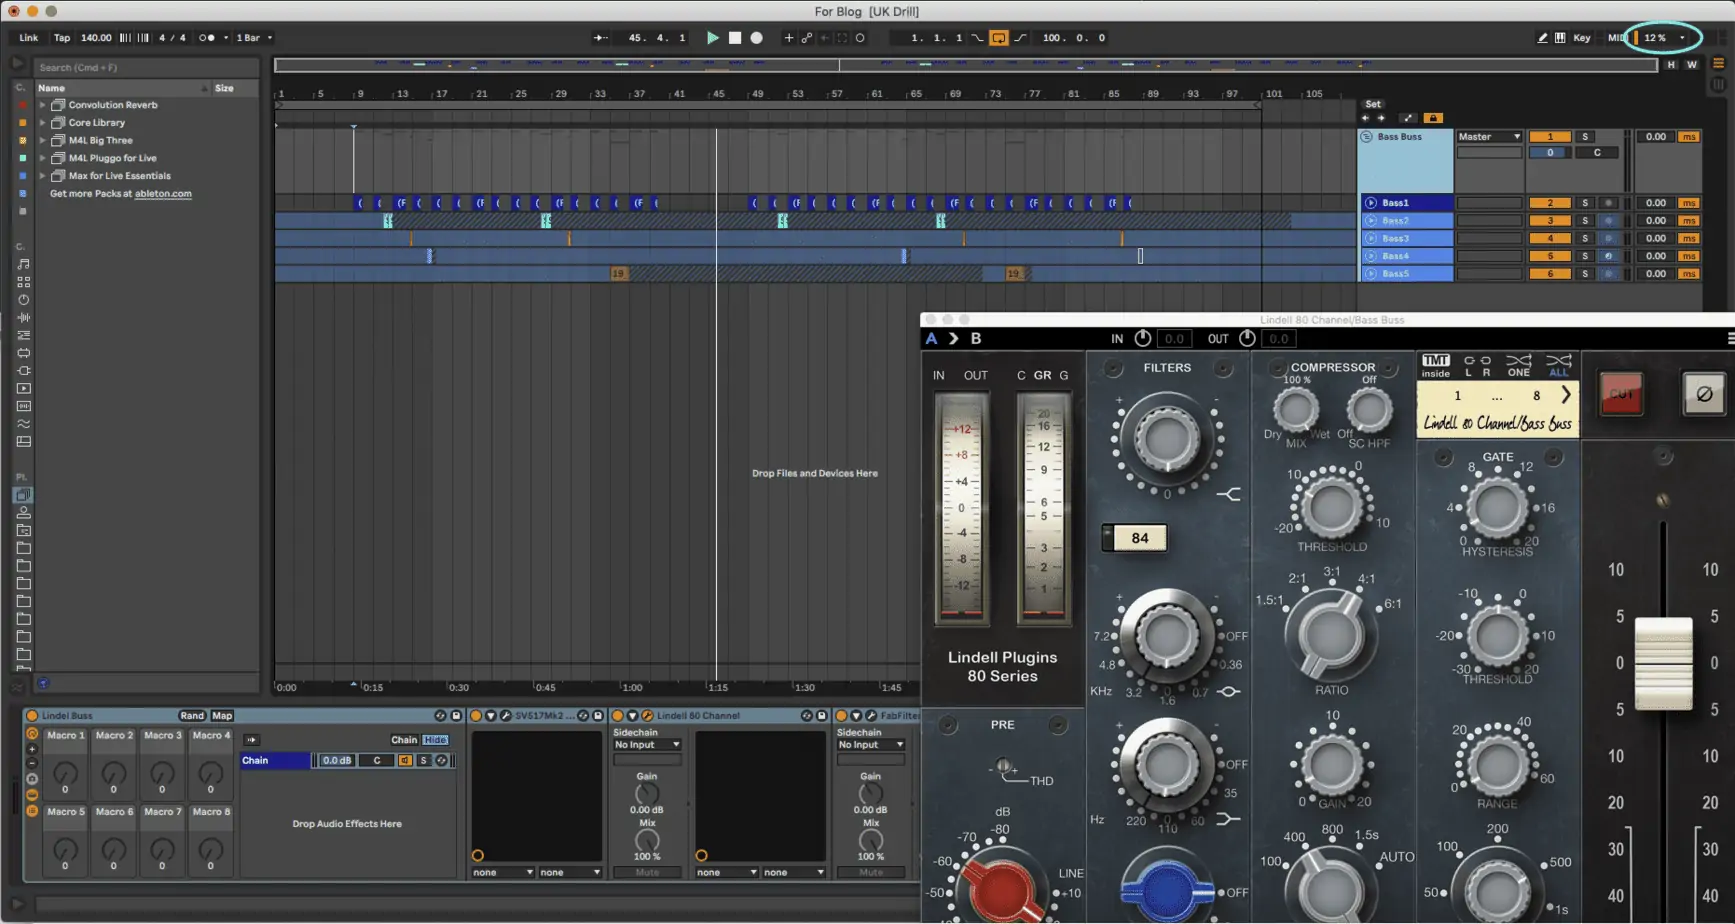
In this session, I’ve grouped five bass tracks to create a “Bass Buss.” The effects inserted into “Bass Buss” are Sonalksis EQ, Lindell 80, and Fabfilter Pro-L.
To be honest, the CPU load from “Sonalksis EQ” and “Fabfilter Pro-L (without oversampling)” is minimal. In this case, the “Lindell 80” is what’s putting a strain on the CPU (indicated by the light blue circle in <Screenshot 5>).
“Lindell 80” is set to x2 oversampling by default, so even on a relatively fast computer, inserting it into more than 10 tracks could create a significant load on the CPU.
That is why, we will freeze the group track “Bass Buss” in this article.
MChannelMatrix Setting
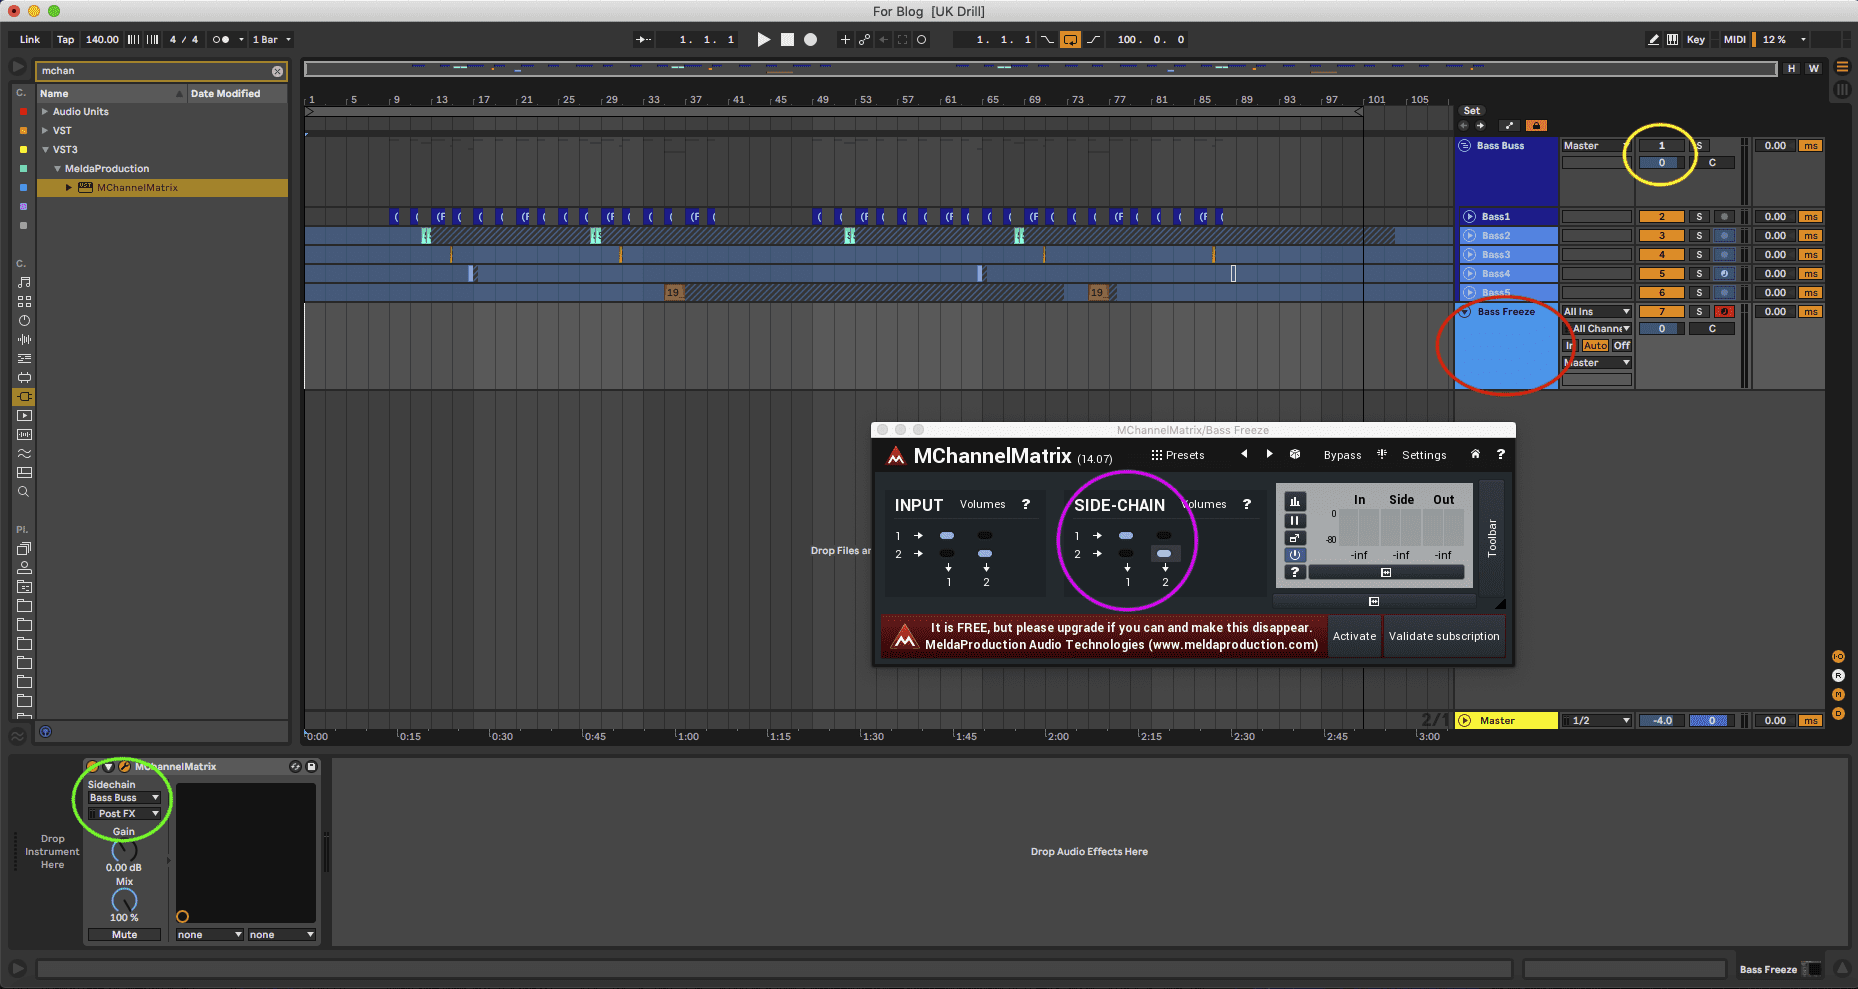
- Create a MIDI track. Make sure to create it outside of the “Bass Buss” group.
- In this example, I’ve named this MIDI track “Bass Freeze” (indicated by the red circle in <Screenshot 6>).
- Set the “SIDE-CHAIN” section of MChannelMatrix in <Screenshot 6> (indicated by the pink circle) as shown in the diagram: 1=1(left), 2=2(right).
- Next, set the input source for “Sidechain” (indicated by the green circle in <Screenshot 6>) to “Bass Buss.”
- Finally, turn off the output of “Bass Buss” (indicated by the yellow circle in <Screenshot 6>). If you don’t, sound will come from both “Bass Buss” and “Bass Freeze,” resulting in a blast of sound. Don’t forget to turn it off.
That’s it. Routing is done. Currently, the sound processed by the effects in “Bass
Buss” is set output to “Bass Freeze” via MChannelMatrix.
However, as there is no MIDI clip at the moment, you can’t freeze it just yet. So, the next
step is to create a MIDI clip.
Create a MIDI Clip for Freezing
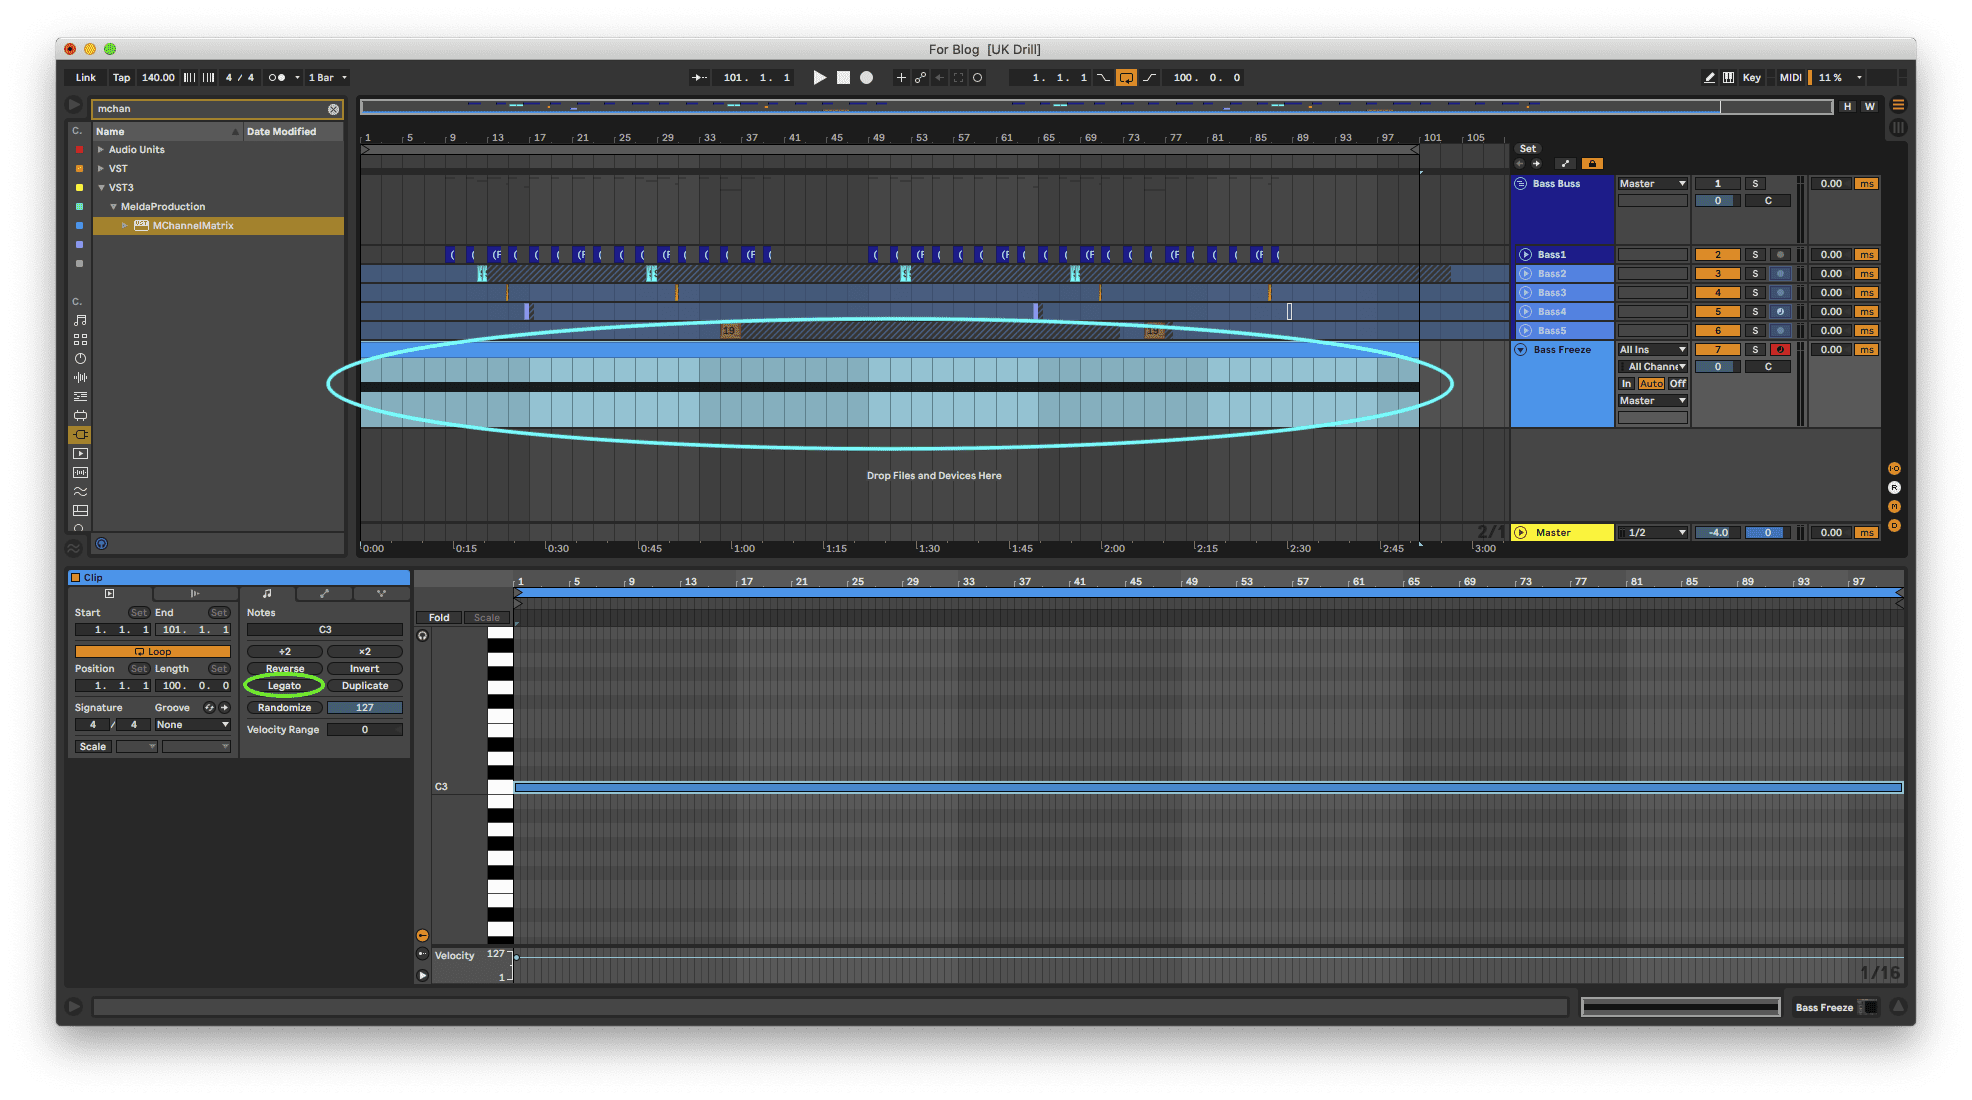
I’ve created a MIDI clip in “Bass Freeze” (indicated by the light blue circle in
<Screenshot 7>). Inside the clip, I’ve simply extended a C3 note from the beginning to
the end.
As a side note and a handy trick, if you place a C3 note at the beginning and press the
“Legato” button (indicated by the green circle in <Screenshot 7>), it will
automatically extend the note’s length to the end of the MIDI clip for you. Quite convenient.
Freeze it baby! Freeze it!
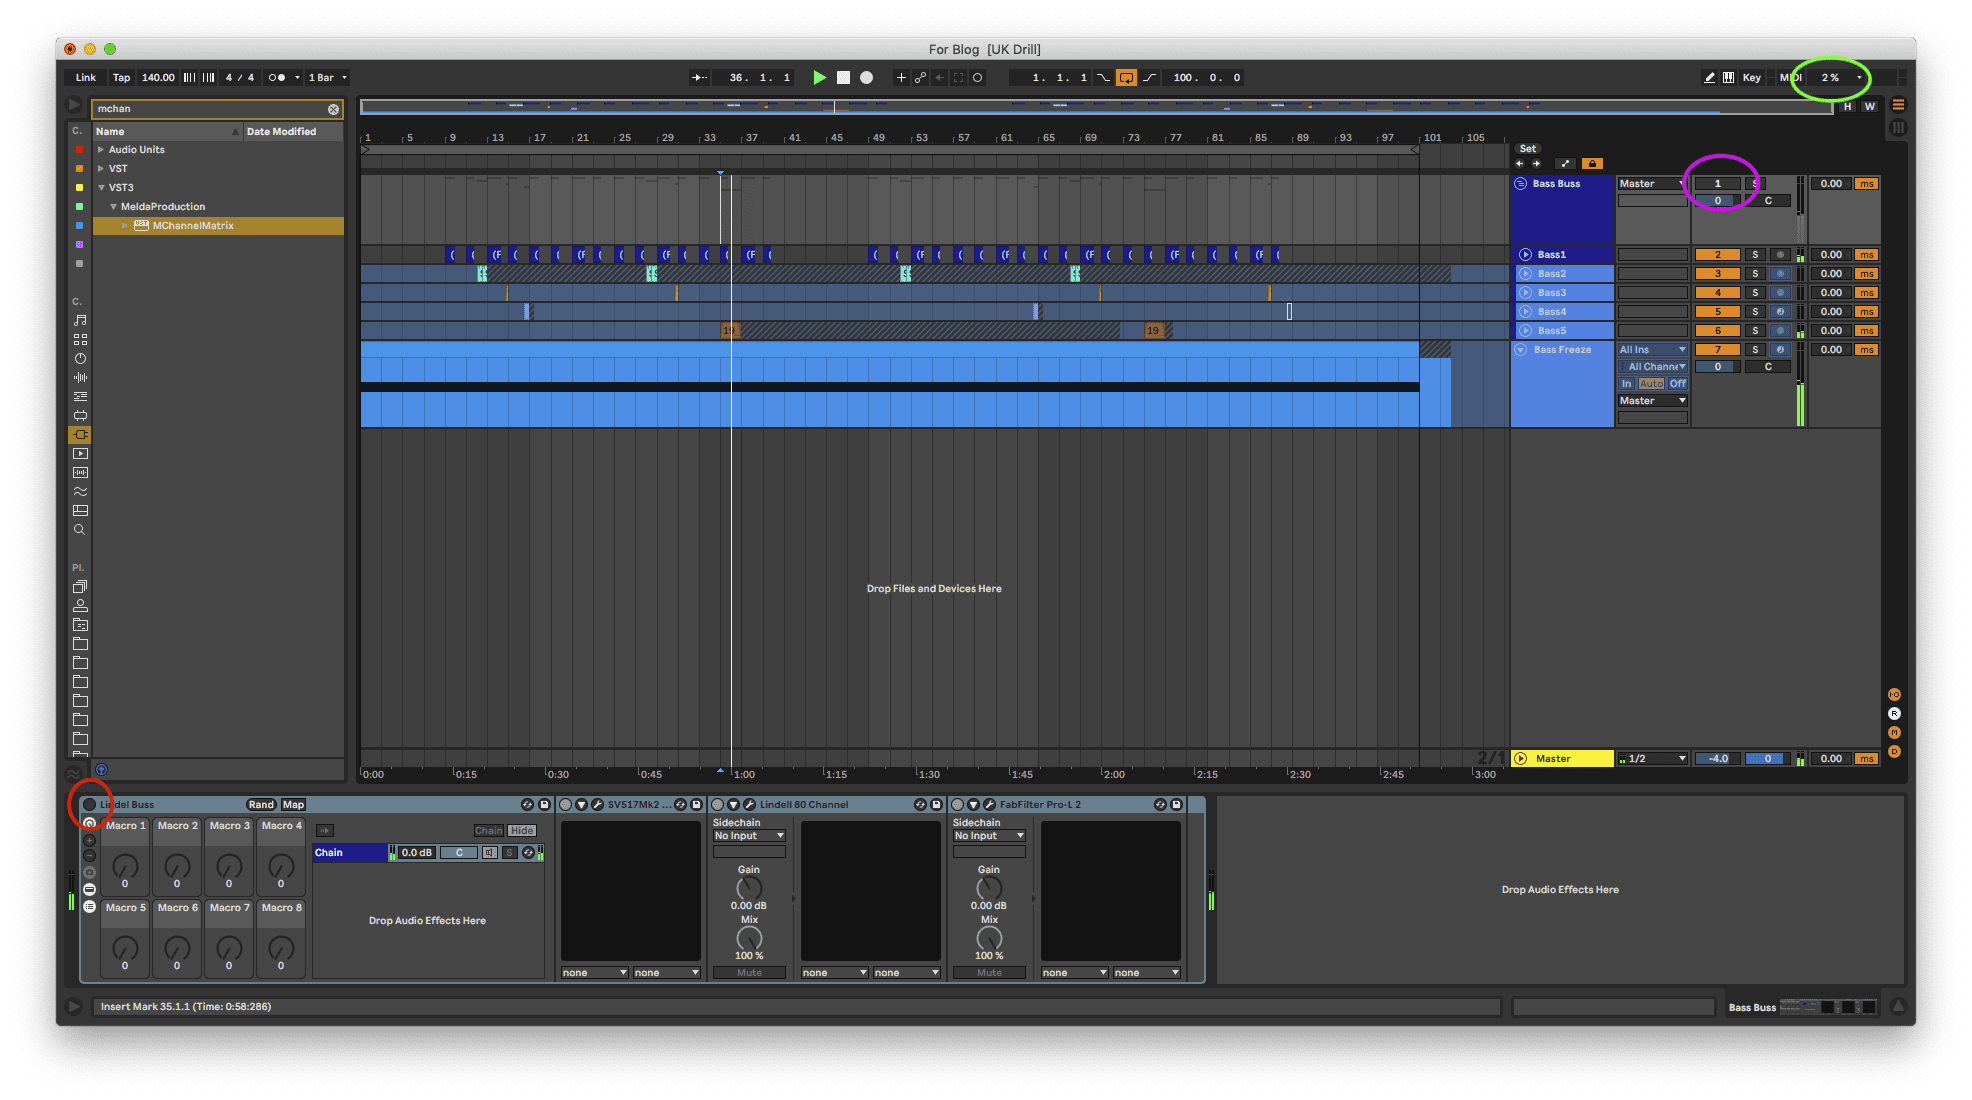
- Freeze the “Bass Freeze” track.
- Turn off the effects inserted in “Bass Buss” (indicated by the red circle in <Screenshot 8>).
- Just to reconfirm, make sure that the output of “Bass Buss” is turned off (indicated by the pink circle in <Screenshot 8>).
At this point, the sound from “Bass Buss” has been frozen in “Bass Freeze.” You should notice that the CPU/RAM previously used by “Bass Buss” has now been freed up (indicated by the green circle in <Screenshot 8>).
If further editing is needed, unfreeze the track and turn the effects back on for the Group
track.
Once you’re done editing, freeze the track again and turn off the effects on the Group track.
For those who are too lazy to read the whole thing, here’s a summary!
I’d like to summarize how to freeze AUX/Group tracks in Apple Logic and Ableton Live in bullet points!
How to freeze AUX tracks in Apple Logic
- Install MChannelMatrix.
- Create an Audio track right below the AUX track you want to freeze.
- Insert MChannelMatrix into the Audio track created in step 2.
- Set the SIDE-CHAIN in MChannelMatrix to 1=1(left), 2=2(right).
- Set the Side Chain input source in MChannelMatrix to the AUX track you want to freeze.
- Set the Output of the AUX track you want to freeze to “No Output.”
- Create a MIDI region in the Audio track created in step 2.
- Draw a single C3 note from the beginning to the end in the MIDI region created in step 7.
- By doing step 8, you’ll be able to freeze the Audio track created in step 2, so go ahead and freeze it.
- Once the freeze is complete, turn off the effects on the AUX track.
This has freed up the CPU/RAM that was being used by the AUX track.
If further editing is needed, unfreeze and turn on the effects on the AUX track. Once the editing is complete, freeze it again and turn off the effects on the AUX track.
How to freeze Group Tracks in Ableton Live
- Install MChannelMatrix.
- Create a MIDI track below the Group track you want to freeze (outside of the Group, not within).
- Insert MChannelMatrix into the MIDI track created in step 2.
- Set the SIDE-CHAIN in MChannelMatrix to 1=1(left), 2=2(right).
- Set the Side Chain input source in MChannelMatrix to the Group track you want to freeze.
- Turn off the output of the Group track you want to freeze.
- Create a MIDI clip in the MIDI track created in step 2.
- Draw a single C3 note from the beginning to the end in the MIDI clip created in step 7.
- By doing step 8, you’ll be able to freeze the MIDI track created in step 2, so go ahead and freeze it.
- Once the freeze is complete, turn off the effects on the Group track.
This has freed up the CPU/RAM that was being used by the Group track.
If further editing is needed, unfreeze and turn on the effects on the Group track. Once the editing is complete, freeze it again and turn off the effects on the Group track.
« Previous Post Next Post »
can you make a video tutorial of it?